When you think of Adobe, you don’t typically think of ecommerce platforms. Adobe has grown to include some exciting features outside of excellent graphical editing tools. One of these features is Magento, which we will discuss in this article.
Is Magento Commerce a great tool that can grow your business? We will find out in this Magento Tutorial.
What is Magento?

Magento is an open-source eCommerce website software made in 2007 under the watchful eye of Varien. It won the SourceForge Community Choice Awards during its early stages.
The company went through many major ownership shifts:
- eBay acquired it in 2011
- Yoav Kutner, one of the original co-founders, left a year later, citing eBay’s lack of understanding of open source projects.
- The breakup of eBay n 2015 transferred ownership as an independent company with funding from Premera Private Equity
- Adobe finalized the acquisition of Magento in 2018, integrating it as part of Adobe Experience Cloud.
Magento 2 was released during this time, and the original (pre-2018) was quickly left behind. Few companies are on the old platform.
Magento 1 lives under OpenMage, which receives long-term support for those who prefer the older platform. Part of the reason for OpenMage existence is some people do not like new management.
After all, you must speak with Adobe Commerce Support to access anything on Magento. Once you get through that, you get access to basic functionality.
The Step-By-Step Magento Tutorial
Step One: Understanding the Product Catalog
Magento’s dashboard enables you to see a left-facing navigation bar. This starts with pages under “dashboard” and “navigation.” The catalog is third from the top, showing your products, settings, and inventory management features.
Adding a Product
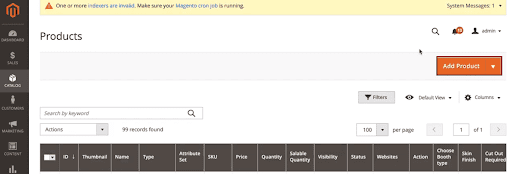
Adding a product is done under the product workspace. You can access it by clicking on the “add product” in the upper-right-hand menu.
From there, you can add product types:
- Virtual (under downloadable products)
- Bundle
- Grouped
- Configurable
Your typical sold item is under “simple product.” Whatever you choose, you will need to fill out the following information:
- Attribute Set (i.e., a product category that selects your remaining items under the listing)
- Product name
- SKU (Stock Keeping Unit for inventory and information tracking)
- Price
- Tax Class
- Quantity
- Weight
- Categories
- Visibility (where it shows up on your site)
- Manufacturing Country
- Media (images and video)
- SEO (Search Engine Optimization for how it appears on google)
- Related products (including upsells and cross-selling)
- Customizable options
- Design (if you would like a unique site theme for this product page)
- Gift options (if you want to allow the user to send a gift message to others)
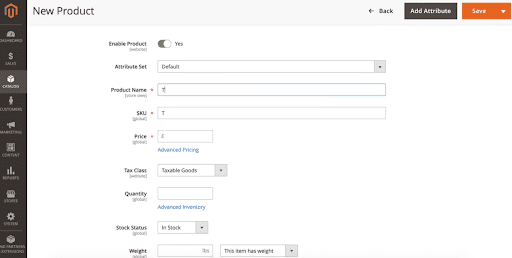
Adding or modifying product details can also come with specific schedule dates in mind.
Inventory Management on Your Magento Account
Inventory management offers a solid bit of control. You are encouraged to familiarize yourself with sources and stocks.
Sources are where you receive the inventory, and stocks are where you store the items. Creating different layers for stocking and sourcing creates a unique system.
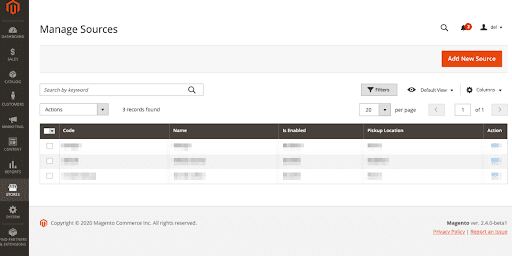
Click on the “stores” tab (third from the bottom) under your navigation bar to add a new source. This can enable you to determine if you have popular products from a particular location. You can also find stocks at the same time.
You can decide who handles what if you run multiple storefronts and digital operations. When running various operations, sorting inventory is crucial for meeting customer needs. If you send merchandise to the wrong store (source), you can correct this from within the system.
Step Two: Using The Adobe Commerce Page Builder
The CMS Page Builder is under multiple links on the dashboard. Under products, you can scroll through until you find the “edit with page builder” button (assuming your product attribute is linked to the page builder). You can also go to the “stores” tab and find it there.
Like other aspects of your Magento Cloud Account, navigation is on the left while a page preview is in the center. Despite accessing page builder sections from anywhere, you’ll most commonly find it under “content,” which you will find under “marketing” in the center.
Configuring The Editor
To start, you’ll need to go to the store’s navigational link on the left side, select “settings,” and go to “configuration.”
In “general,” look for a section under Content Management and expand WYSIWYG Options. Ideally, Adobe will already enable the editor for you. You’ll also want to go back to “advanced content tools” under the same section (content management). The “enable page builder” option should be “yes.”
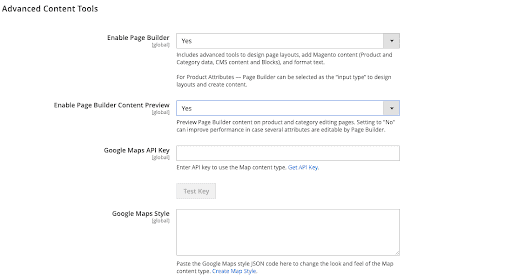
Using The Magento Page Editor
To start, you’ll want to create a new page by going back up to “Content” under the navigation menu, selecting “Elements,” and going to “Pages.” You’ll start by inserting a page title, but move on and look for the design section.
In this, you’ll be able to select the page’s theme. The default Magento theme is already set. Because Magento supports no theme store, you’ll either need to buy them or hire a developer to make a custom theme. Ignore this for now, as the default theme will work fine. You can change this later in the admin panel.
The drag-and-drop interface gives you the following customization options:
- The creation of page layouts depending on design preferences
- The placement of blocks using your layout preference to insert text, image, or Google Maps API content
- The ability to add your product catalog
- Use dynamic or static content depending on what you need.
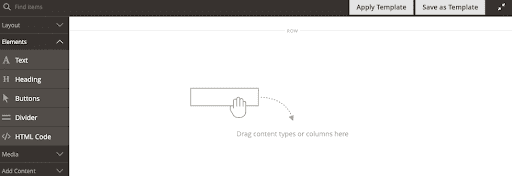
The CMS also allows Adobe Stock integration, providing you with online storage. There’s also content staging, but this is limited to Adobe Commerce (not Magento). Playing with Magento until you get a feel for it is recommended.
Step Three: Using The Customers Menu
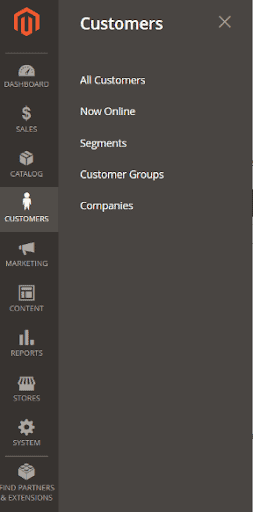
The Customers Menu in Adobe’s Customer Management System. You can view all existing customer data to track how they used your site under the “all customers” submenu.
You can also see currently online customers who might be browsing your wares. Under “Stores,” “Settings,” “Configurations,” you can even see lifetime and limited data. You can even create customer accounts on behalf of the customer (be sure you have their permission to do so!).
Most of the functionality of this menu is limited to enterprise users.
Enabling B2B Features for Your Online Store
Members of Adobe Commerce gain the option to activate company users. By enabling this feature, you can establish these features:
- Company credit accounts
- Different users within the company
- What access the company has to other pricing options on your store
- How the company structure and positions may differentiate access to your site
Establishing different customer groups under the “customers” tab will enable you to sort through these people. You can also differentiate them by tax class. So if you work with some tax-exempt organizations, you can group them easily.
Step Four: Marketing and Sales Tools
Adobe also includes various sales and marketing tools. Below, we will break down your options:
Adobe Marketing
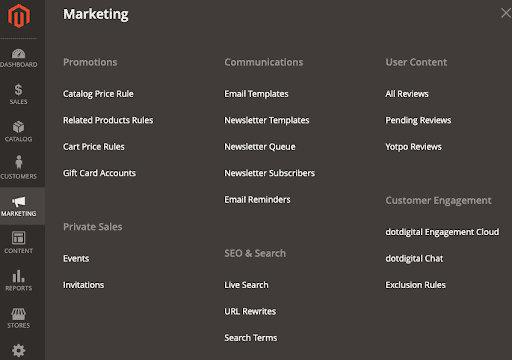
- Communication Tools – Programmatic email templates are automatically sent out in given situations (cart abandonment, order confirmation, etc.). Adobe also offers tools for releasing regular newsletters.
- Wish Lists – Creating wish lists can be enabled under the store’s configuration settings. You can also encourage wish list sharing through the same sections.
- Comparing Products – Product relationships allow you to up-sell and cross-sell products with greater ease. A “recently viewed” option also reminds visitors of their recent (and long-term) shopping history. Product recommendations are limited to Adobe Commerce.
- Promotions – Catalog and cart price rules enable you to establish sales per cart and item. While many related product rules are hidden behind enterprise accounts, there is still a lot of power in setting regulations.
- Merchandising – This aspect allows you to establish loyalty programs, private sales, and gift registries. Most of it is hidden behind enterprise tools.
- Live Search – The ability to search your site for desired products based on given keywords. Also limited to adobe commerce. (i.e., can be “powered by Google”)
- SEO and Google Features – Apply Google Analytics or an Adwords account for deeper tracking and apply metadata, URL rewrites, and sitemap use so Google can easily find and index you. It also provides domain authority information.
Sales Tools
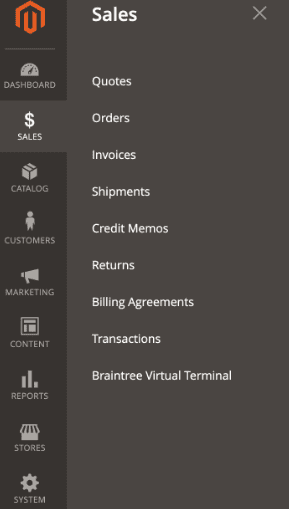
The sales menu (second from the top) allows you to track orders and manage payment services. Here is what you can work on here:
- Point of Purchase – You can manage the checkout experience and the shopping cart from this page. Magento often verifies the existence of stock before making a sale (as long as you’ve set it up).
- Order Management – You can track orders, invoices, and look at billing agreements and sales history here. You can also create and manage shipments under the “Orders” submenu after clicking on “Ship.”
- Payments – Magento supports both PayPal and Braintree for its payment processing. Klarna allows you to split costs into fours for less common needs, increasing your conversion rates. Payment services enable you to dictate currencies you accept and manage live payments.
Magento vs. Adobe Commerce – Cost Comparison
Adobe Commerce, which is powered by Magento, is the more expensive variant. It has access to more advanced features of Magento 2, which is what Adobe is selling.
The standard version of Magento is something you can find available in free variants. However, many of these above walkthroughs will have to be tweaked slightly.
Because pricing is “dependent on needs,” Adobe doesn’t reveal this upfront. However, the cost estimates of Magento are somewhere around $1500 a month.
This high cost is mainly due to the target audience of Adobe: medium to large-size businesses with development professionals who can manage these pages.
Conclusion – Is Magento Worth It?
Putting it straight: Magento is not worth it to those who aren’t large businesses or web development specialists. Trying to contact a sales professional will reveal this quickly.
Adobe’s lack of transparency likely results in a lot of wasted time. However, Adobe does not follow suit in this process with its design-based products. You don’t have to contact anyone to use Photoshop through Creative Cloud.
If you are a smaller eCommerce business, check out some of our comparable guides on Wix or Squarespace. Those are far more user-friendly and have more competitive pricing.
For additional Magento information, check out the Adobe Commerce User Guide. You can also talk to customer service through the Adobe Commerce Help Center, where you can use their search engine and additional filtering features to find more complex topics.
