When you establish a Shopify store, you own your website traffic. Unlike Amazon or eBay, you don’t have to rely on someone else. Instead, everything is up to you, meaning you get most of the profit.
However, selecting a product type, paying for online advertising, and creating your eCommerce website can be a bit daunting. This guide will help make your process less daunting and show you how to set up Shopify store easily.
What is Shopify?
Shopify is an all-in-one eCommerce store toolset. It includes a website builder, payment portal support, and the ability to host multiple products and collections easily.
Shopify has been around for more than a decade, growing its empire to over five thousand employees. Unlike other ecommerce platforms, you own the domain and the website traffic.
What You Need Before You Start
Before you start Shopify, you need a launch checklist, so here’s a complete list of things you need to take care of:
- A store name that’s catchy and identifiable
- Products to sell
- Different sales channels (local, eBay, Amazon, etc.)
- Your home and products pages ready to go
- Email notifications so you can keep track
- Optimized content and images across all pages
- A marketing plan (i.e., email marketing campaign)
- Tax settings ready
- Shipping ready
- A customer service plan
- Billing setup
- Analytics tools
Before you do all that, you need to register for an account.
How To Register for Shopify
Before you get anything rolling, you need to have a good idea of navigating the platform. Thankfully, Shopify has a 14-day free trial you can use to try them out.
To register for this trial, follow these steps:
- Click the “start free trial” button in the upper-right-hand corner of Shopify.com
- Enter your password, email, and store name

Try not to worry too much about your name; you can change it later in the general settings. For now, this is just the test phase.
Choosing a Shopify Premium Plan

Excluding enterprise accounts, there are four premium plans to choose from. The big difference between plans is the number of staff accounts and fees. Here’s a quick overview:
| Plan | Staff Accounts | Transaction Fees | Credit Card Rates | International Domains |
| Lite – $9 /mo | 1 | About 3% | 2.9% | No |
| Basic – $29 /mo | 2 | 2% | 2.9% | No |
| Shopify – $79 /mo | 5 | 1% | 2.6% | Yes |
| Advanced – $299 /mo | 15 | 0.5% | 2.4% | Yes |
Users of Shopify Payments can waive transaction fees but will not affect credit card rates. All plans come with Shopify POS lite for making direct payments. If you sell high quantities of products, you should consider pursuing more expensive programs. There is no known discount code to reduce the price further.
Selecting What Products To Sell
When selecting the type of products you want to sell, you’ve got a few ways to do this. Either way, it is best to choose products you have some personal experience with. After all, you need to answer questions about what you plan on selling.
Here are some popular approaches you can take:
- Use existing eCommerce sites. Good business ideas often come from what already works (only you do it better). Use best sellers of specific product categories to find out what products work across eCommerce.
- Find trending products. Both Google Trends and the Amazon Trend Report provide data you can take action from. Using historical data is how a business owner can identify short-term fads from evergreen products.
- Social media sites. Pinterest, Twitter, Facebook, and Instagram all have various methods of finding trending topics. Leveraging social data will give you an idea of what currently popular products in your niche look like.
It is crucial to understand that information works across multiple stores when performing product research. Selecting in-demand products based on current trends is essential whether you create handheld products or get into mass production.
Select Your Product Sourcing Methods
Once you decide on what products to sell, you can determine your sourcing method. Here are some of the more popular ways and sites you can use:
- Dropshipping. It has the lowest barrier to entry because a third party handles warehousing and shipping. The result is generally low earnings potential. Known sites are Oberlo and Modalyst.
- Private label sales. Selling a private label involves you contacting manufacturers and placing your brand. It has the highest potential for long-term brand loyalty, but it can be challenging to find a good supplier. Good sites include Alibaba and Thomas.
- Online/retail arbitrage. Involves buying from sites that offer discounts and reselling at a considerable markup. Good websites include Walmart, Target, and Home Depot.
- Wholesale. Involves taking established brands, buying in bulk, and reselling the discounted products on eCommerce marketplaces. Shopify uses Handshake; other options include Faire.
- Multi-vendor marketplace. Shopify is a unique platform to enable multiple sellers to sell on your storefront. The drawback is you will have to negotiate share and focus on advertising other people’s products. Jetti and Multi-Vendor Marketplace are two apps you can use for this.
You can also choose to sell handmade items and software that you make. Shopify offers a lot of opportunities.
Selecting Your Payment Gateways & Methods
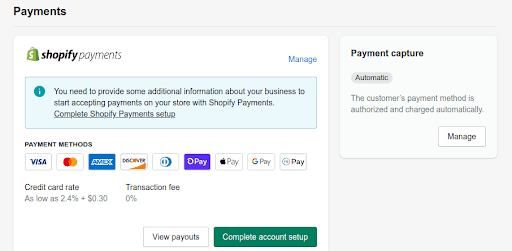
Shopify Payments is Shopify’s platform for receiving and processing payments. The more you pay for premium plans (see above), the less you pay for transaction fees.
Shopify supports the following checkout options:
- Visa
- Discover Card
- American Express
- Apple Pay
- Google Pay
- Amazon Pay
- Facebook Pay
Shopify includes fraud analysis with all received payments. Shopify will not assist you in obtaining alternative payment methods.
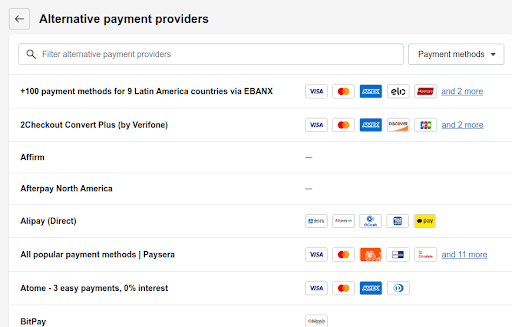
You can access a list of approved third-party payment providers here:
- Select “settings” when logged in
- Choose “alternative payments.”
- Click “choose alternative payment.”
Shopify does allow you to take manual payments, but you will need to handle those yourself. For example, if you want to take a direct ACH, COD, or cash, you can do that.
Be warned that Shopify offers no protection if these go badly. Also, you will need to establish a custom payment method through these steps:
- Go to “settings” and click on “payments.”
- Under “payment providers,” choose “create custom payment method.”
- name the payment method and describe it under the “additional details” section.
- Under “payment instructions,” tell the customer how to make a payment.
Setting Up Your Shipping Rates
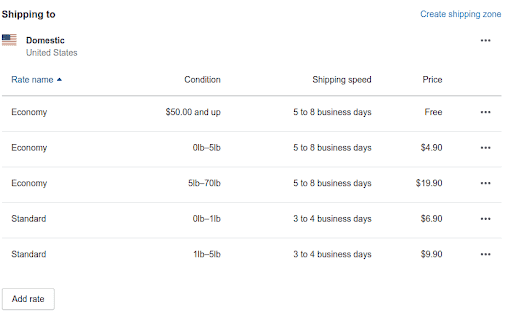
Under Shipping Settings, you’ll find “Shipping and delivery,” an area that allows you to calculate shipping rates. Here are your options for shipping:
- Flat shipping rates. This shipping option enables you to select a static rate depending on individual product weight, size, or shipping zones. Different combinations of these elements might change the overall cost.
- Calculated shipping rates. Rates are determined based on a third-party service provider (i.e., FedEx, UPS, Canada Post, etc.)
- Free shipping. A great way to attract customers, but be careful that you still earn a profit.
At any point, you can choose to edit rates, delete rates, and manage rates under the settings menu. For free rates, be sure to set the price value to “0.”
If you do not want to handle fulfillment (a fancy word for shipping and warehousing), you can choose to pay for Shopify Fulfillment. But expect to pay fees to them for storage, shipment, and special treatment.
Shopify Fulfillment is specific to sellers between 10 and 10 thousand items, making it suitable for medium businesses.
Establishing Your Legal Policies
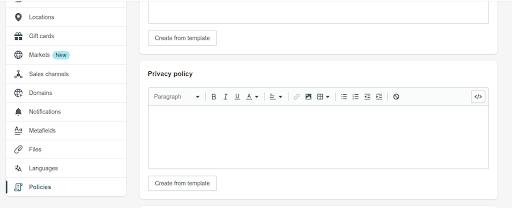
When creating an online store on Shopify, you must have your legal settings ready. There are four disclosures necessary to avoid legal troubles:
- Refund policy. This policy details what you do in case a customer requests a refund.
- Privacy policy. This policy tells people what you plan to do with their information.
- Shipping policy. It enables you to establish how long shipping takes and how much it costs.
- Terms of service. Policies detailing what you generally do when people use your website.
Shopify allows you to generate these through your settings automatically. However, you might want to read through them and consult a legal expert.
Some products have tricky requirements depending on where you live. As you start making sales, be sure you have clear guidelines for all customers who buy your products.
Choosing a Shopify Theme
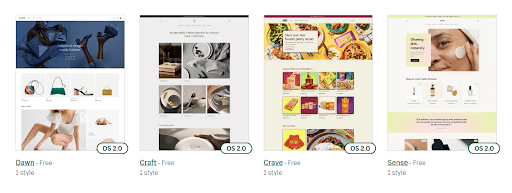
With Shopify 2.0 being officially out, themes and customization have entirely changed. Costs of buying a Shopify theme can be well over $200 but can create a unique customer experience.
Thankfully, the Shopify Theme Store groups them by industry and collection. Regardless of how you sell, Shopify does make it easy for you to determine what theme is best for you.
The Dawn Theme (Shopify’s 2.0 default) is heavily customizable if you do not pay for premium themes. You might hire someone on freelance sites like Fiverr or Upwork if you want to create a custom store logo.
Creating Website Pages
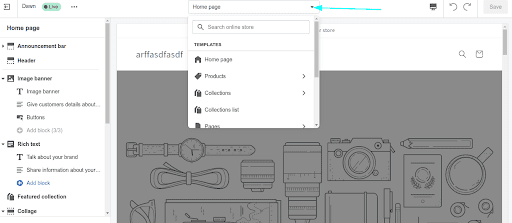
Standard Shopify pages are necessary for people looking for more information about you and your business. These usual eCommerce pages include the following:
- Home page. The where most people first land (sometimes called the landing page). It should contain a comprehensive review of your site offerings.
- Product page(s). Pages where you feature each product. It includes descriptions, titles, images, and important product details.
- Collection page(s). Collections include related products into categories. Each collection page may describe the product category.
- About page. A page dictating company/store details inspires people to buy from you. It is a great place to make an emotional connection.
- Contact page. A way to easily connect with you via a form and social links. Likely will be the second most common place for people to complain after Twitter.
Navigation menus on the top of your site should provide easy access to these pages. You usually develop a dropdown menu for collection pages under the products tab.
If you sell a small number of products, operate locally only, or provide custom items, these pages might be different for you. Edit the pages until you find something that makes sense for your goals.
Play with the Shopify 2.0 website builder until you feel comfortable. For those who are tech-savvy, it is a pretty straightforward interface. Otherwise, look up online tutorials.
Understanding Site Optimization
Site optimization is the process of making your site appealing to all visitors. There are many factors to this that include the following:
- Search Engine Optimization (SEO). SEO makes your site appeal to target keywords. SEO involves the strategic placement of search terms people type into Google to find your site and what it sells.
- Technical Optimization. The process of making your site load fast and functional. There is a lot of backend work, making it an aspect of SEO.
- Local SEO. Performing activities to make people aware that your business operates in a specific location. This process involves creating location-based elements, establishing a Google My Business account, and leveraging local Schema.
It is vital to have a working knowledge of SEO most beneficial for your needs. If you can, targeting the local area gives you a unique advantage.
Adding Products To Your Store
To sell products, you must be able to add them. You can do so following these instructions:
- From your Shopify Admin page, select “Products.”
- Select “add product.”
- Fill in the details.
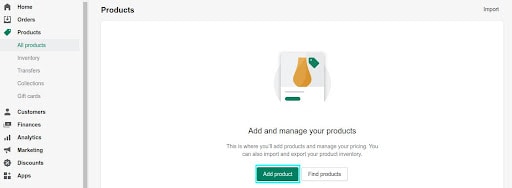
From there, you’ll need to fill in the following:
- The name and type of your product
- The description of your product should contain persuasive details and keywords.
- High-quality images and videos.
- Price
- Compare at price (if you are offering it on sale)
- Tax code (specific to sending tax codes to a third-party service for Plus members)
- Cost per item (can include manufacturing/original cost of the item if you want to disclose your information)
- SKU (Stock Keeping Unit) for tracking your inventory levels and sales
- Barcode (tracking product details and shipping)
- Inventory policy (establishing inventory tracking)
- Quantity (number of times in stock if a correction is needed)
- Incoming (number of units you are receiving or the fulfillment location is receiving if you use Shopify fulfillment)
- Shipping details (weight, region, HS code for tariff purposes)
- Selecting whether (or not) you are sending a physical product or digital product
- Variants (different colors for clothes or sizes of product)
- Subscriptions ( if you are offering subscription services)
You can preview the item using the search engine preview to ensure everything is selected accurately. Having a solid mete description can be why some people convert to your products.
You can also easily remove and edit the product from the products page.
Creating Collections for Your Products
To create a collection, you have one of two options:
- Automated collections. Groups that you made based on conditions of matching products. For example, creating a tag that says “modern” when you sell different furniture types.
- Manual collections. Groups that you must manually create and maintain.
Follow these steps for a manual collection:
- Go to “collections” under “products.”
- Click “create collection.”
- enter details (title and description of collection).
- Select manual under “collection type.”
- Return to products and search for those you want to add.

For automatic collections, change step four to click “automatic” for “collection type.” From there, you can choose variants based on these factors:
- Title
- Variant details
- Vendor
- Price
- Other product details
You can set programmatic conditions to divide these categories. For example, you can set it up so your “value items” are all in a single collection. Becoming familiar with these Shopify store settings will enable you to grow as a seller more effectively.
Conclusion – Who is Shopify Best For?
Because of the low barrier to entry, Shopify can be for any level. It has excellent growth potential for those on their first day or tenth year. However easy it is for most, it is a bit more challenging for those not willing to work with a website builder.
Those who do not want to develop a brand or marketplace might find themselves enjoying using third-party eCommerce sites. However, Shopify is ideal if you wish to the lion’s share of profits.
